The Easy Approach to Frequencies
Frequency spectrum is a hard concept to grasp, even if you’re more experienced with music and recording / mixing world. EQ is one of the most helpful tools when talking about mixing, as covered in the post “The Easy Approach to EQ”. It can cut or boost all the different frequencies of any track you want. While EQ might be familiar to most, it seems to be a mystery what frequencies you should boost or cut and when.
How should you approach frequencies?
As for many other things as well, there are good and bad ways to approach frequencies. In the web there’s so much misleading and bad information about frequencies and EQing. The solution that’s often offered to beginner mixers are an EQ cheat sheet (frequency chart) or ready given answers.
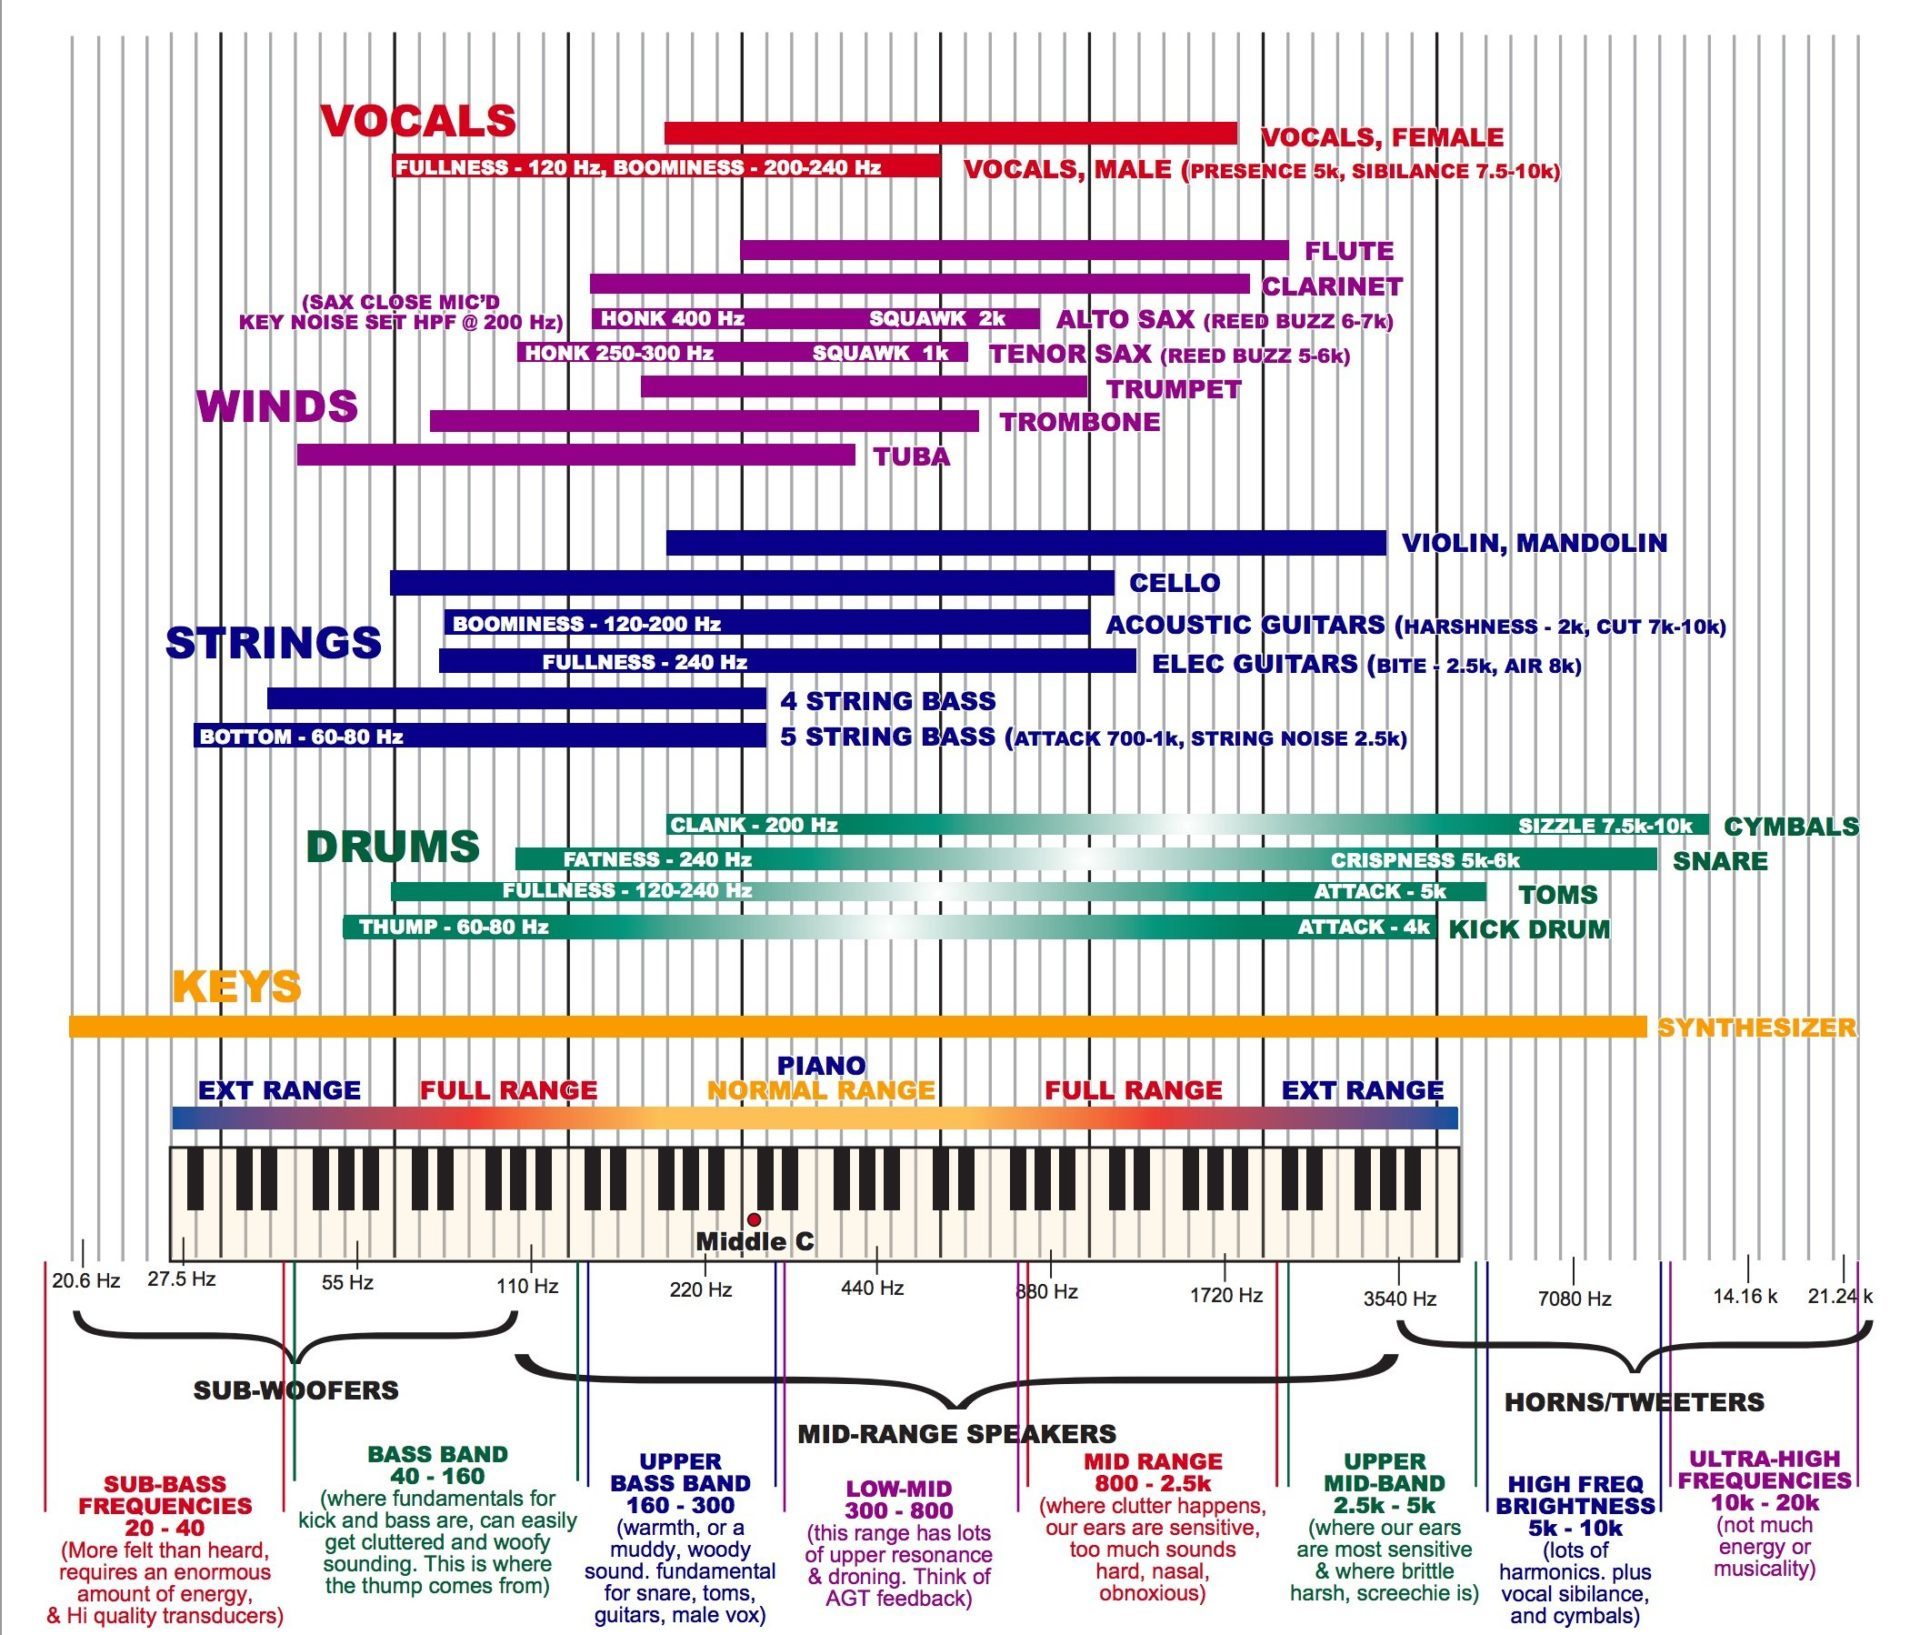
In EQ cheat sheet you’ll find every possible instrument that you can possibly imagine. It shows the frequency spectrums of all the instruments and points out where all the different sonic attributes are, such as “bottom, mud, warmth or honk”. It tells you for example where to boost a certain instrument to get more bottom or warmth in the sound.
Don’t use charts or cheat sheets
The frequency charts are designed to look great and informative, but they’re actually quite deceiving. They look cool but that’s about it. There’s no real specific information available. The suggestions that they offer, use a way too broad range of frequencies for everything.
The main problem is that the cheat sheets assume you’re mixing all the tracks soloed and individually without ever listening in the context of the whole mix. They teach you to mix with eyes rather than with ears and that’s the worst thing you could do to your future mixes.
Why?
If you’ve ever recorded anything or listened to the recorded tracks, you know that they can be drastically different from one another each time. There’s so many ways to mic an electric guitar and even the slightest change in the angle of microphone changes the tone. You can’t instruct someone to EQ an electric guitar always the same way, because there’s just too many different sounds to begin with. As you can see, this is where the frequency charts and ready answers go wrong.
The easy approach to frequencies
I would recommend to approach frequencies a little differently: Learn the five main frequency ranges to know the ballpark of where different kind of frequencies live, but acknowledge that in the end it’s all about ears. Because all you really want to be able to do, is to hear a frequency that you like or dislike and know where to find it.
Frequency ranges
The five frequency ranges are there to help you narrow down the options when you’re looking for the frequency that you hear in your head – and to form associations that helps you to pinpoint frequencies faster. Here are the five frequency ranges:
- Bass 20 – 250 Hz
- Low Mids 250 – 500 Hz
- Mids 500 – 2000 Hz
- Upper Mids 2000 – 4000 Hz
- Highs 4000 – 20000 Hz
Bass
Bass is usually divided into sub-bass (20 – 60Hz), and upper bass (60 – 250 Hz). The sub-bass is in the area of lowest frequencies that humans are able to hear. These frequencies are usually unhearable with normal pair of speakers, you’ll need a subwoofer to playback them. These are also the only frequencies that you can feel physically. Upper bass is an area where the kick and the bass battle from power. The fatness and thickness are situated here. Too much causes boominess whereas too little makes the mix sound skinny and weak.
Low Mids
Low Mids are the place of mud. Too much low mids cause muddiness whereas not enough mids cause a thin sounding mix. These frequencies are usually cutted rather than boosted.
Mids
Mids are a sensitive area. This area determines how dominant the instrument is. Subtle boosts and cuts can change the instrument drastically. Boosts from 500 Hz to 1000 Hz can end up sounding honky whereas boosts from 1 kHz to 2 kHz can sound really nasty and even hurt your ears. Be careful with the latter. There’s usually no need to boost too much in the mid area, except for the lead instrument, because you want to make it the dominant one.
Upper Mids
Upper Mids are similar to mids in terms of sensitivity. Small boosts or cuts make a big difference to the mix. Together with highs, upper mids can add a sense of presence. A boost here makes a vocal track have that certain crispness.
Highs
Highs are responsible for air, clarity and of course presence. Too much ends up sounding annoying and hissy – too little makes the track sound flat and distant. You can create that sparkle and air with highs.
Those are the five frequency ranges, but there’s no need to get too caught up in them. Like I said earlier, the most important thing is to use your ears. Also, it matters a great deal how the whole mix sounds. For example, your electric guitar track might sound fairly thin on it’s own, but in the context of the mix just perfect. This is why you want to use EQ while listening to the whole mix.
How to find the problem frequency that you’re looking for?
Let’s take an example of how to find a frequency using the five frequency ranges and your ears:
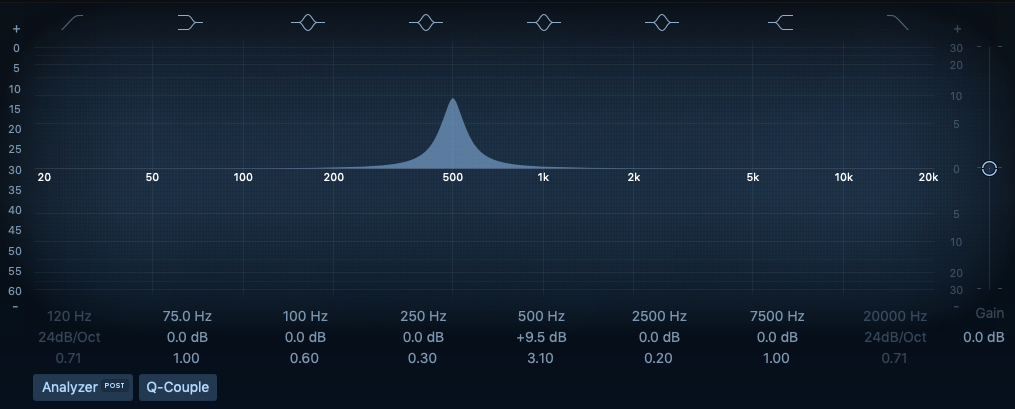
Let’s assume that you’re starting to mix a song. You have EQ in your Mix Buss track, where you’ve routed every track in the mix. That means that the EQ affects all the tracks.
You hit play and the mix sounds okay, considering no mixing’s done yet. You press pause and take a listen to a commercial pro mix. It has obviously more power, life and treble. Then you switch back to your mix again and hear a certain frequency pointing out. It’s making your mix sound slightly muddy.
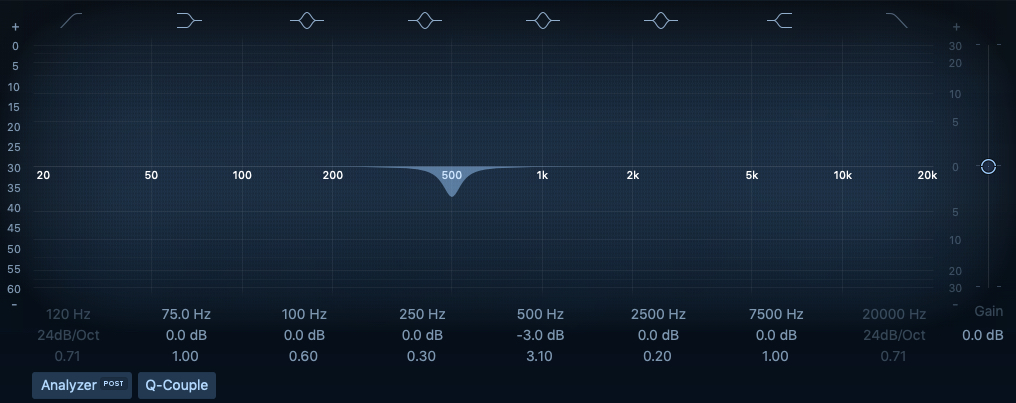
As you’ve already made the association with muddy sound and low mids – you know that the muddy frequencies are somewhere between 250 and 500 Hz. You open the EQ and set up a bandpass filter and narrow down the Q. Then you boost it up a good amount to hear properly what’s happening in that area. You start to sweep around the low mids and there it is – around 500Hz you’ll find the frequency that makes everything muddy. You cut that son of a mud down around 3 dBs and make the Q a bit wider. Job done.
Practice makes you better
Don’t worry if the associations don’t happen overnight, because they won’t. It takes practice, time and more practice to become better at finding the frequencies you’re looking for. However, this is the workflow that makes you a better mixer. Not EQ cheat sheets. You don’t need to Google or watch tutorials of what frequencies to cut or boost. Trust your ears. You’ll get better. And the faster you start trusting your ears, the faster you develop them.
Hopefully this post was helpful to you. If you’re looking for more awesome material, here are two of my information packed downloadable pdf guides:
5 Steps to Create Music Faster (..and avoid the writer’s block!)
6 Step Guide to Realistic Midi Drums
You can download them for free today, no strings attached. Enjoy!

2 thoughts on “What Are the Frequencies on an Equalizer?”