How to Mix Midi Drums? (The Pro Way)
As you’ve already read my earlier posts “How to Make Realistic Midi Drums” and “How to Create Midi Drums Faster”, the next logical step is to learn how to mix midi drums wisely. This is where you take your good sounding, realistic midi drums and take them to the next level. Are you ready? Good, let’s go.
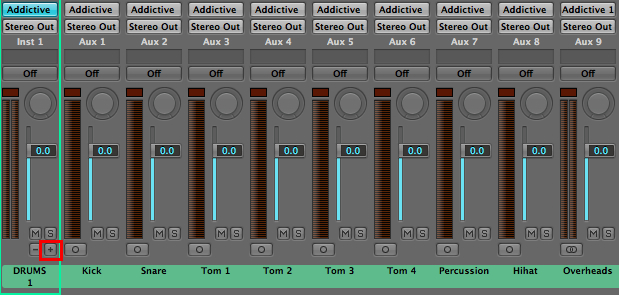
The first step is to separate the drums to different tracks. Most of the drum plugins come with the option to route different drums to different tracks. All the drum plugins have different ways of routing the drums. Whichever plugin you’re using, you can surely find the instructions on how to do that on the manufacturer’s site. For example, Addictive Drums let’s you do the routing the following way:
1. In your DAW as you select the plugin, select the one with multiple outputs, not stereo.
![]()
2. Click the + sign (marked with a red square) to add individual drum tracks.
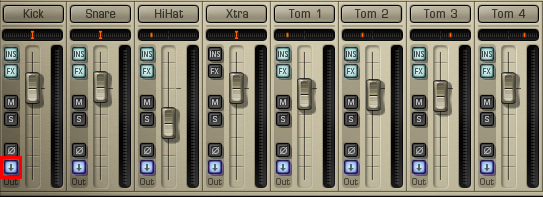
3. Open the plugin and activate the “Out” button (marked with a red square) from the drums you want to send to the created drum tracks.
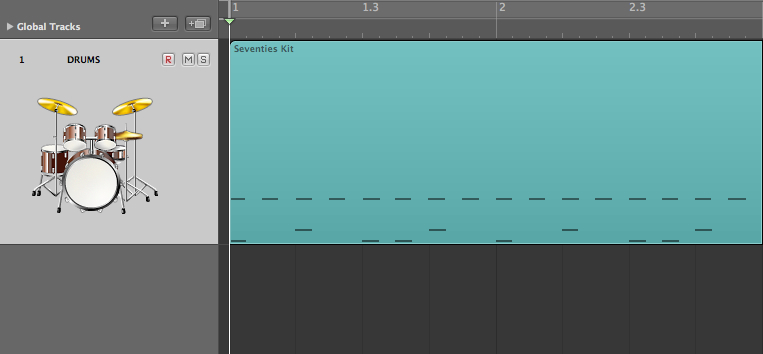
In case, you’re using a stock plugin or a plugin that has no option for routing, do it the following way:
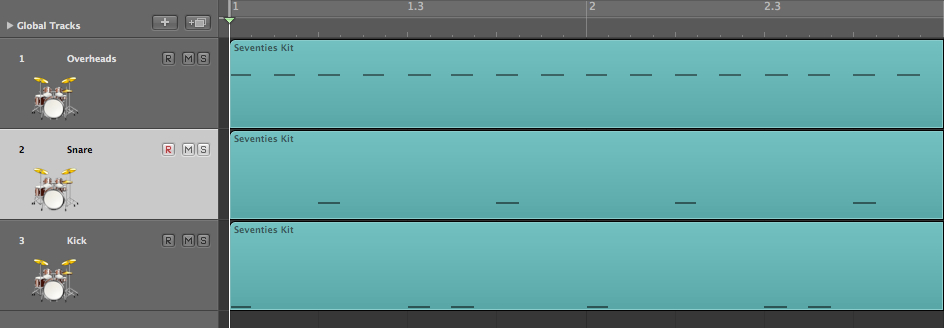
1. At first, you have the drum beat in a single track.
2. Duplicate the track and the midi content over as many times as needed (as many drum tracks as you need).
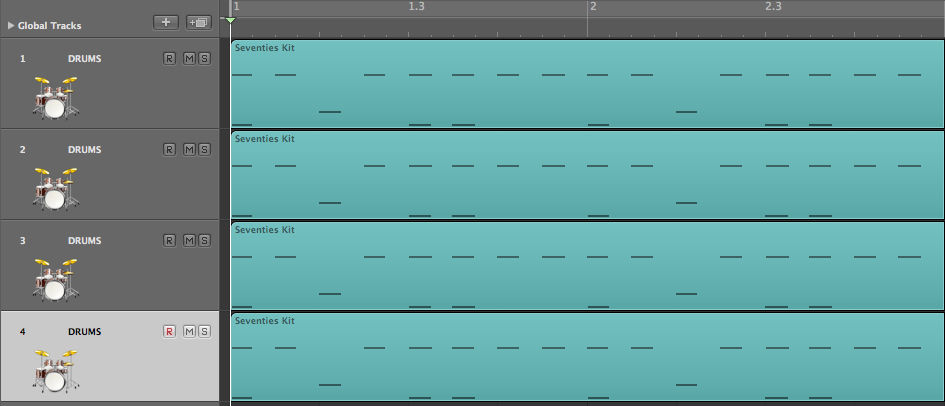
3. Name the tracks and leave only one drum per track (kicks to kick track, snares to snare track etc.) Delete all of the other hits from the tracks.
Now you should have the drums on individual tracks. As you’ve reached the point where you don’t need to make any more changes to the drum notes – and you are ready to mix – you should bounce (render) the tracks to audio. This is because:
- It will free up the processing power of your computer. You need to save the precious processing power, as you need it for mixing with plugins too. Drum plugins can eat up humongous amounts of memory of your computer, especially if you’ve routed or duplicated the plugin.
- Drum plugins (and other software instruments that are feeded by midi) play same notes slightly different every time. They’re programmed to variate the hits and use different samples even though the velocity is practically the same. Before mixing, you want to have your tracks in audio in order to have unchangeable performance.
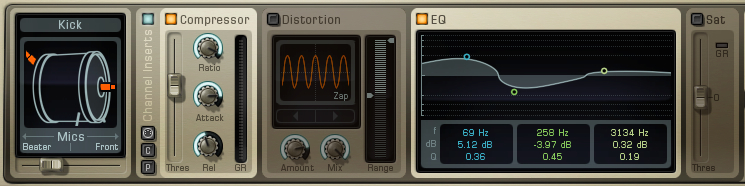
Some drum plugins allow you to mix the drums inside the plugin. By all means, use them before you bounce the drums to audio. They’re typically used for shaping the sound rather than mixing the drums. In Addictive Drums for example you can find compression, EQ, distortion, saturation and reverbs. If your drum plugin has some sort of reverb, don’t be afraid of using it to put your drums in a space. It is likely a reverb that’s designed for drums, and therefore sounds alright.
As you’ve bounced your drum plugin tracks to audio, you’re ready to mix the midi drums. Even though you’re using a drum plugin that’s programmed to use high quality samples of high quality drums, they tend to need a bit of EQ, compression and a sense of space. Note that drums are mixed together with other instruments. The frequency response of other instruments have an influence on the drum mix. It’s highly unlikely that you would mix your drums alone, with no other tracks. The following steps are merely examples of what I typically do to my drum tracks in a mix. The steps are done in the middle of the mixing process of the whole song.
Route your drums to busses, for example like this: Kicks to Kick Bus (if you’ve got more than one kick track), all snares to Snare Bus, all toms to Tom Bus, hihat, overheads and room mics to Overheads Bus, and all the remaining drums tracks (and the Busses you’ve created) to Drum Bus. Now you have all the drums under one fader and you’re able to use mixing processing such as EQ to effect all the drum tracks by using one plugin.
Use subtractive EQ (cutting) first. Start by cutting out low frequencies that you don’t need. Use a low cut filter in every drum track, even in the kick. You can cut a fair amount of lows away from tracks such as overheads, hihat, percussion and even snare and toms, whereas in the kick track somewhere around 30-40Hz is a common figure. The idea is to get rid of the low frequency rumble and free up space for the kick and the bass guitar.
Continue EQing the drums. Use an EQ in your Drum Bus to hunt down common muddy, honky and/or annoying frequencies that are occupied in all of the drum tracks. After that move on to do the same on the individual drum busses. Listen in context of the whole mix. Nobody will hear the drums soloed.
After subtractive EQ, use the additive EQ. Enhance the good sounding frequencies to make your drums pop out of the mix. For example use a high shelf to boost up the upper frequencies of your drums to give some air and crispness. Watch out for boosting the low end too much, drums get boomy quite easily.
Here are some examples of what different frequencies could reveal:
- 50 – 100Hz – Power for kick and floor tom / boominess
- 100 – 250Hz – Fatness for kick and snare, power for smaller toms / muddiness
- 400 – 1kHz – Ring of snare, / boxiness
- 3 – 5kHz – Snap and attack for snare kick and toms, beater for kick, presence for cymbals / harshness
- 7 – 12kHz – “Air” / hissing
The approach to compression is different compared to real drums, as with midi drums the performance should already be quite even. You don’t need to even up the performance, so you can focus on lifting the energy and the life of the drums.
This can be done by increasing the decay of drums, so that the energy comes through more audibly. In technical terms this means that you should use a slow attack to allow the initial transients through. At the same time use a fast release time to make the drums more “in your face”. You can start with the slowest attack and fastest release and slowly adjust the attack to be faster and release to be slower. Adjust the attack time and when the drums start to lose the transients turn it a bit slower. Make the release faster until the drums start to sort of “breath”. Avoid excess pumping. Aim for 3-6 dB gain reduction. You can compress both the individual drums and the Drums Bus.
Parallel compression can be used to make midi drums more thick and lively. Send drum channels of your choice to a bus that is compressed really hard. Then blend in the compressed signal with the uncompressed drums. Route the parallel bus to your Drums Bus. Depending on what you want, you can squash the life out of the parallel track or maybe highlight the transients.
Finally put the midi drums in a space. Send your individual drum tracks to a bus and set up a reverb plugin there. You could use, for example a room or hall reverb, depending how big you want the space (or in fact the drums) to sound. Set the length of the reverb so that it fits together with the song. For example, you want the snare reverb to die out before the next snare hit starts. Blend the reverb in with the dry tracks. A good rule (or a starting point) is that the reverb is just loud enough that you miss it when you mute it, but not so loud that it’s clearly audible.

When you’re mixing a song, there comes the time to use automation. There’s much that can be done to drums with automation: For example, you can increase and decrease the overall volume of the drums, or volume of individual drums. Read my post about automation to find out more.
There you go. Now your midi drums should be both realistic and mixed. To recap, treat your midi drums like real drums. Route drums to individual channels and bounce them to audio. Route your bounced drum tracks to busses. Start the mixing with subtractive EQ followed by additive EQ. Use compression and parallel compression for a fuller sound that is filled with life and energy. Use reverb to add a sense of space. Don’t forget automation! Mixing midi drums doesn’t need to be rocket science.
I’ve put together a guide specifically for making realistic and more powerful midi drums faster and easier. You can download it here: 6 Step Guide to Realistic Midi Drums, no strings attached, it’s yours for free.