Automation – The Cure for Flat and Lifeless Mixes
Have you ever compared your mix to a commercial pro mix? How well did it stand next to it? For me it was like this: I got the mix sounding good on my speakers, but when comparing to a pro mix, I noticed a clear difference. My mix was a bit flat sounding and it was lacking some energy. My mix wasn’t bad by any means. It was well balanced and you could hear all the tracks well. What was it then? It was automation.
It is a tool that can be used to automate an individual tracks volume, panning or basically anything you want. When you hit playback, the track follows the automation moves you’ve done. A question arises: can you get away with not using automation at all? I’m afraid with today’s standards – you can’t. Do you feel like it’s too complicated and you just don’t want to bother? I know, I thought like that as well.
Don’t worry, I have great news for you! In this post I’m opening up the concept of automation and showing you, how applying automation can drastically improve your mixes.
What is automation?
To put it simply, automation is a tool that can automate different functions, such as volume of a track. For example, if you want your guitar track to be louder in the chorus and a little less louder in the verse, you can automate it. This is done by opening up the automation view and drawing the volume changes in with a mouse. This is called the “Draw mode”. There are several modes available.
Other way to do this is by using a “Touch mode” that allows you to press play and move a fader while the song is playing. This will record your automation moves and once you let go of the fader, it will go to the position you’ve set it to be before you touched it. When you hit play again, it follows the moves you made. “Latch” is pretty much like “Touch”, except once you let go of the fader, the value will stay where you leave it. “Read” mode simply plays back the automation moves made on the given track.
Like mentioned above, it’s not only a volume and panning that you can automate. There are no limits here. You can choose which parameter you want to automate. For example you can automate the EQs highpass filters frequency or any other parameter of any plugin.
How to use automation?
When to use this handy tool then? Use it at the very end of the mixing process. As you get the mix to sound as good as it can be without any automation, adding the final touches with it is much faster a job. If you start messing with it too soon, it’s a bitch to correct and change your automations later on. You can use automation essentially on three cases:
- Fixing mixing problems
- Improving balance
- Guiding the focus of the listener
Fixing mixing problems
What I mean by fixing mixing problems, is that you can fix what compressor, static EQ, de-esser or any other mix processing tool fails to do correctly (or enough). See, automation is so much better and accurate solution than any compressor, for instance, could ever be.
This is because a compressor doesn’t have ears, nor understanding of the big picture, but you do. You could automate a bass track to be in a perfect balance, but it would take hours manually. Thit is the reason why you want to use a compressor for the bulk of the job and automate only the things a compressor can’t do right or enough.
This kind of thing could be, for example a bass guitar’s pick sound that sticks out too much on some parts of the song. It could be that a de-esser (a tool that tames the consonants such as a letter S) eats way too much of the vocal tracks sibilance on one or two instances. Or it could be a harsh frequency in a vocal track at the end of a chorus. Basically you want to automate these kinds of unwanted side-effects, noises or momentarily fails of mix processors.
Improving balance
Automation for balance may seem somewhat self-explanatory, but it’s actually a bit more complex a process than it sounds. You want to make sure the listeners hear the important tracks all the time, especially vocals. You’ve already used EQ and compression to make the vocals sit as good as they can on the mix, but there’s still some work to do.
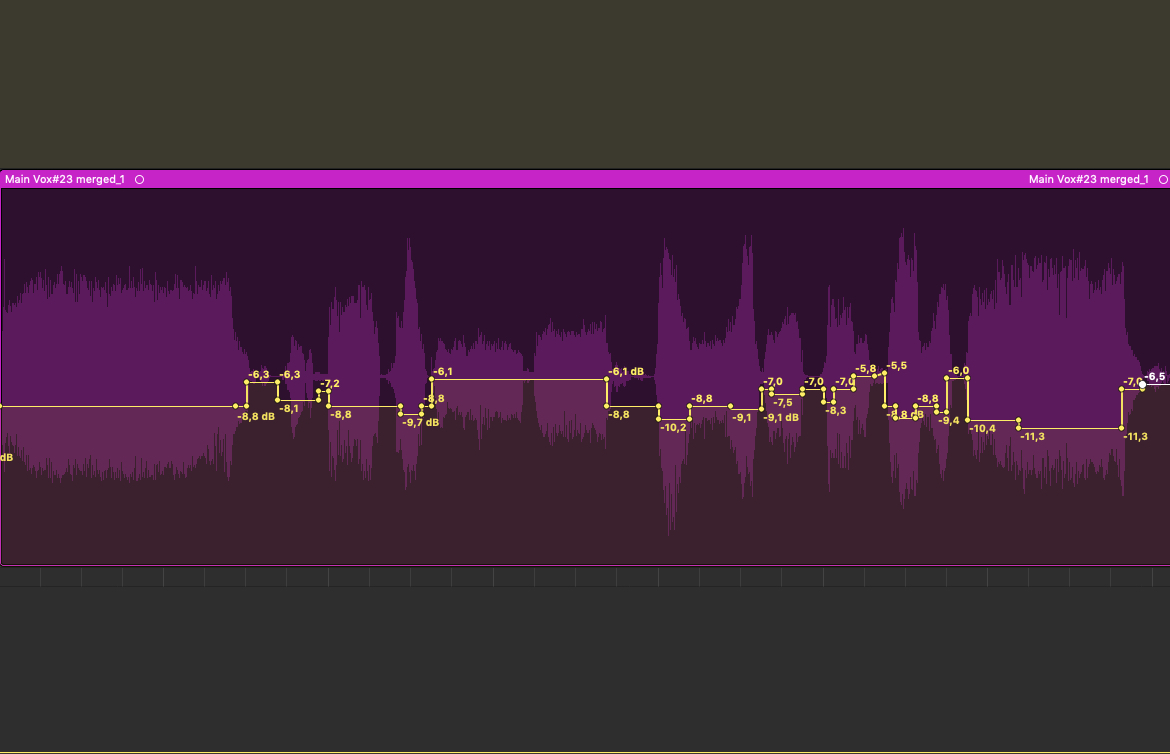
Automation rides
This is where automation rides come in. When you automate a track, the process is called “a ride”, thus automating a vocal track is called “a vocal ride”. Listen the song from the beginning, use a low listening volume and focus on the vocals. When you feel the vocal gets buried or lost even just a little bit, that’s your clue to ride the vocal up at that point. In case the vocals seem too loud, turn it down a notch.
How much? That depends, sometimes one dB will do it, but you may have to do as extreme boosts or dips as much as 6dB to make it clear enough. Ride the vocal track all the way to the end of the song. Don’t let a single syllable get lost. Focus on the ends of the sentences and words.
You can use a volume automation for this, but the other solution is to automate a gain plugin. This will give you a more detailed scale and it’s easier to bypass if needed. I know I said to always do automation at the very end, but with vocals you can do it also early on: Automate the gain plugin before using EQ or compression. This will even up the vocal performance and help the compressor’s work a lot.
Creating space
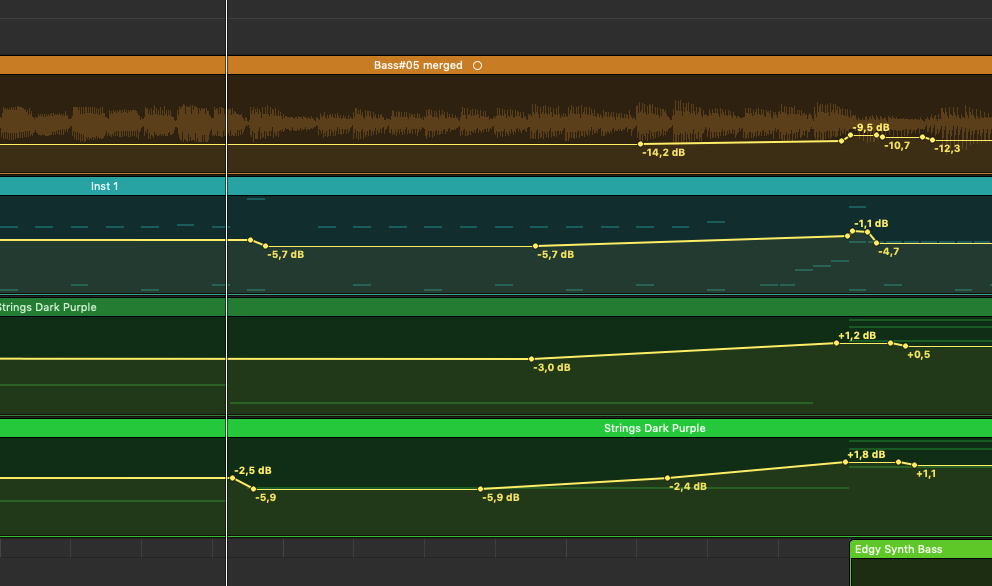
Sometimes you have to boost “too much”, at least you get the feeling you’re boosting too much and the vocal starts feeling too loud. In case like this, consider automating backing tracks to a lower level, creating more space for the vocals.
Most of the time listeners won’t even notice any drop in other tracks, they just hear the vocals more clearly (as long as you’re not lowering drums or bass). Make automation rides on all the most important instruments, like you did on the vocals. You can also automate pads, strings and other virtual instruments to come and go more smoothly.
For better balance, you might need to create space in the busy parts of the song. Creating space may include automating EQ. Let’s take a simple example. There’s usually many more instruments playing at the same time in the chorus than in the verse. What you could do, is to automate an EQ to get more instruments stuffed in, without overcrowding the mix.
Set a low cut filter to cut some low end of the piano track in the chorus. This will free up space for other instruments, without losing the piano. Automate the low cut filter to be bypassed everywhere else than in the choruses. After all, you don’t want your piano to sound too thin after the hard work of EQing it to perfection.
Guiding the focus of the listener
After you’ve enhanced the balance with automation, it’s time to guide the listener’s focus. Make sure the listener hears the most important track all the time, on each moment of the song. Create constant tension. For most of the time, it’s the vocals that keep the attention of the listener. However, when the vocals have a break, something else has to come in and keep the spark alive. This means the sections of the song, like an intro, where there’s no vocals at all.
Make no mistake, it also means the shorter breaks in vocals, between the sentences and during longer notes. This could be something like a drum fill, an other instruments fill or a delay that’s automated a bit louder during a short break of vocals.
Use automation on drums, pads, effects and such to lift the energy towards the chorus. Automate them to slowly build up to make the buildup seem bigger than it really is. When the chorus kicks in, lift the first hit of cymbals and guitar chords to grasp the attention of the listener. If you have pads, strings, keys or something of the sorts playing in the background, you could introduce them to the listener at some point by lifting them up a bit momentarily, when there’s space for them.
The power of contrast
Tension can also be created with the power of contrast. You could make the verses drier and choruses wetter by automating the amounts of reverb and delay. Making choruses wider is also something that’s done more often than not.
This can be done by automating instruments wider in the stereo field or using wide panned delays for instance. Drums can also be used to create contrast. For example, automate overheads, room mics and / or parallel compression track to be louder in the chorus to lift the energy up a bit.
Summary
There you have it. I know it seems like a lot, but once you digest the main ideas of automation, it’s actually a pretty simple process. Remember the three main functions of automation: 1. Fixing mixing problems, 2. Improving balance and 3. Guiding the focus of the listener. I guarantee, experimenting with automation is going to take your mixes to the next level. Use imagination and there are no limits for your songs.
Before you go, download my free guide 5 Steps to Create Music Faster to avoid the writer’s block and increase the tools at your disposal.

2 thoughts on “Automation – The Cure for Flat and Lifeless Mixes”