The Easy Approach to Compression
Compressor seems to confuse many home studio owners more than any other mix processing. It doesn’t have to be that way, because in the end compression is the same thing as a volume fader. It just has the ability to do balance changes automatically.
Compressor is simply just an automatic volume fader. The main idea of a compressor can easily be forgotten with all the controls and functions staring right at you. What is compression and how, when and why to use it? Let’s dive right in.
Why do you need compression?
Let’s dive in with a straightforward example: lead vocals. You have a vocal track recorded and you start to set it in the mix. You pull up the fader so that majority of the vocals are audible and easily heard, but the quieter parts are lost in the mix.
If on the other hand, you set the volume so, that you can hear the quieter parts, the majority of the vocals are way too loud. As you can see, fader by itself can’t give you a balanced outcome. Let’s stick with the first option for now, where you can hear most of the vocals fine.
This is where a compressor steps into the picture. It reduces the volume differences between loud and quiet parts of your vocal track by turning down (compressing) the louder parts and then lifting the overall volume back to the point you’ve set earlier. As a result you’ll have a more even vocal performance.
When do you need compression?
Compressor can be a handy tool, but there’s a time and place for it. How do you know if you should use one at all? The most simple clue is that you want to figgle the volume fader in different points of a mix and adjust it back and forth. When you can’t find a static position to a fader, try compression.
Think about the lead vocal track. Most of the time it’s on a good level, but then you want to lift the volume up a bit when you can’t hear the quieter part. The other reason to use a compressor is to make a performance more even. No musician maintains a perfect balance, so you might want to even that up. A drummers snare hits can be uneven throughout the song. A guitarists picking may not be constant all the time. A bass player can’t play as tightly and consistently as is needed in most mainstream genres.

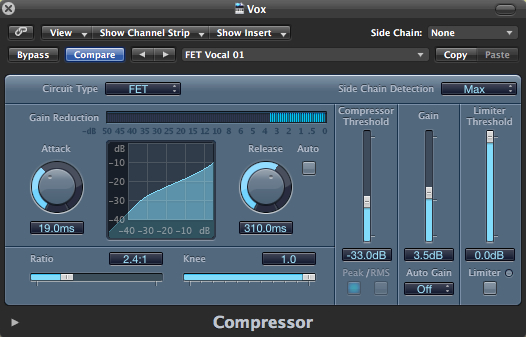
Main controls of a compressor
Before going more deeply on how to use a compressor, let’s take a look at the main controls, which are attack, release, threshold, ratio and gain.
Attack determines how fast the compressor reducts gain of the audio. Think it like this: the slower the attack, the more dynamics and transients are preserved. Use slow attack for more energy and fast attack for more sustain and fatness.
Release determines how fast the gain reduction resets. The faster the release is, the faster it will reset before the next transients arrive.
Threshold chooses the point where the compressor “starts working” and starts turning audio down. You have to turn down the threshold to increase gain reduction. If the threshold is set to 0dB (which is usually the starting point), no gain reduction is happening.
Ratio determines how aggressively the compressor turns down the audio. Ratio of 1.5:1 reduces the audio just a little bit, whereas 12:1 hammers it down like crazy.
Gain (make up gain) is used to lift up the overall volume. The point is to “make up” the volume loss that is made by compression. There’s also an Auto Gain function, but turn it off as you want to match the gain manually.
Using a compressor
When using a compressor, you want to focus on the gain reduction meter. It shows how many dBs of audio is turned down. Let’s continue with the earlier example, lead vocals, but this time focus more on to the “how” part. If using compressors is completely new to you, start out the following way.
Preset as a starting point
At this point, you have the vocal track on good volume most of the time (except the quieter parts). Insert a compressor on the vocal track and choose a vocal preset. A preset gives you a nice starting point with attack, release and ratio, but you still have to adjust threshold and gain, because the person who made that preset has no idea how loud your track actually is.
Adjusting threshold
Lower the threshold so that the meters shows 3 – 6 dB of gain reduction at most. Then use the make up gain to compensate the “lost volume” so that when you bypass the compressor, the overall volume of the track doesn’t change. Ask yourself: Did you get more stable a track and solve the balancing problem?
If the answer is yes, the compressor has done its job. Try to turn the threshold up a little bit, and match the volume and see if you could get away with a little less compression for more natural outcome. Compressing too much adds up quickly and you could end up sucking all life out of your song.
On the contrary, if the answer is no – and the balance is still an issue that remains – try to adjust the fader again to find a balanced point. If you can’t, try turning threshold even further down to get more gain reduction. Is it helping get the “static fader” without making the track sound awful and unmusical? If yes, then move on to the next track that needs to be balanced.
Adjusting further
Again, if the answer is no, then you might need to adjust attack and release or try another preset / compressor. One solution is to make two different tracks out of your vocal track. For example, cut verses (quieter parts) to the track one and choruses (louder parts) to the track two. This way you can use different compressor settings on different tracks to get a more even performance with more musical results.
You can start with a preset and adjust attack, release and ratio from there. Unlike EQ, there’s no harm done by using a preset as a starting point. However, it is useful to know how these controls affect the compressor. How to know when to use low ratio or high ratio, fast or slow attack and release?
Adjusting ratio
High ratio is used whenever you want to cut peaks all together from your track. This might be something like getting rid of annoying pick sounds of bass that are really dynamic and jump out of speakers. If your goal is to only turn down these pick peaks, then use a high ratio and adjust the threshold so that gain reduction is happening only at the peaks.
In contrast, slow ratio is used when the overall dynamic range is too overwhelming, for example strumming acoustic guitar. You might want to set the threshold just above the softer, quieter level and then choose a low ratio to gently compress the loudest parts. This way you’re not squashing the guitar, but rather lowering the dynamics while maintaining musicality.
Different attack and release times for different purposes
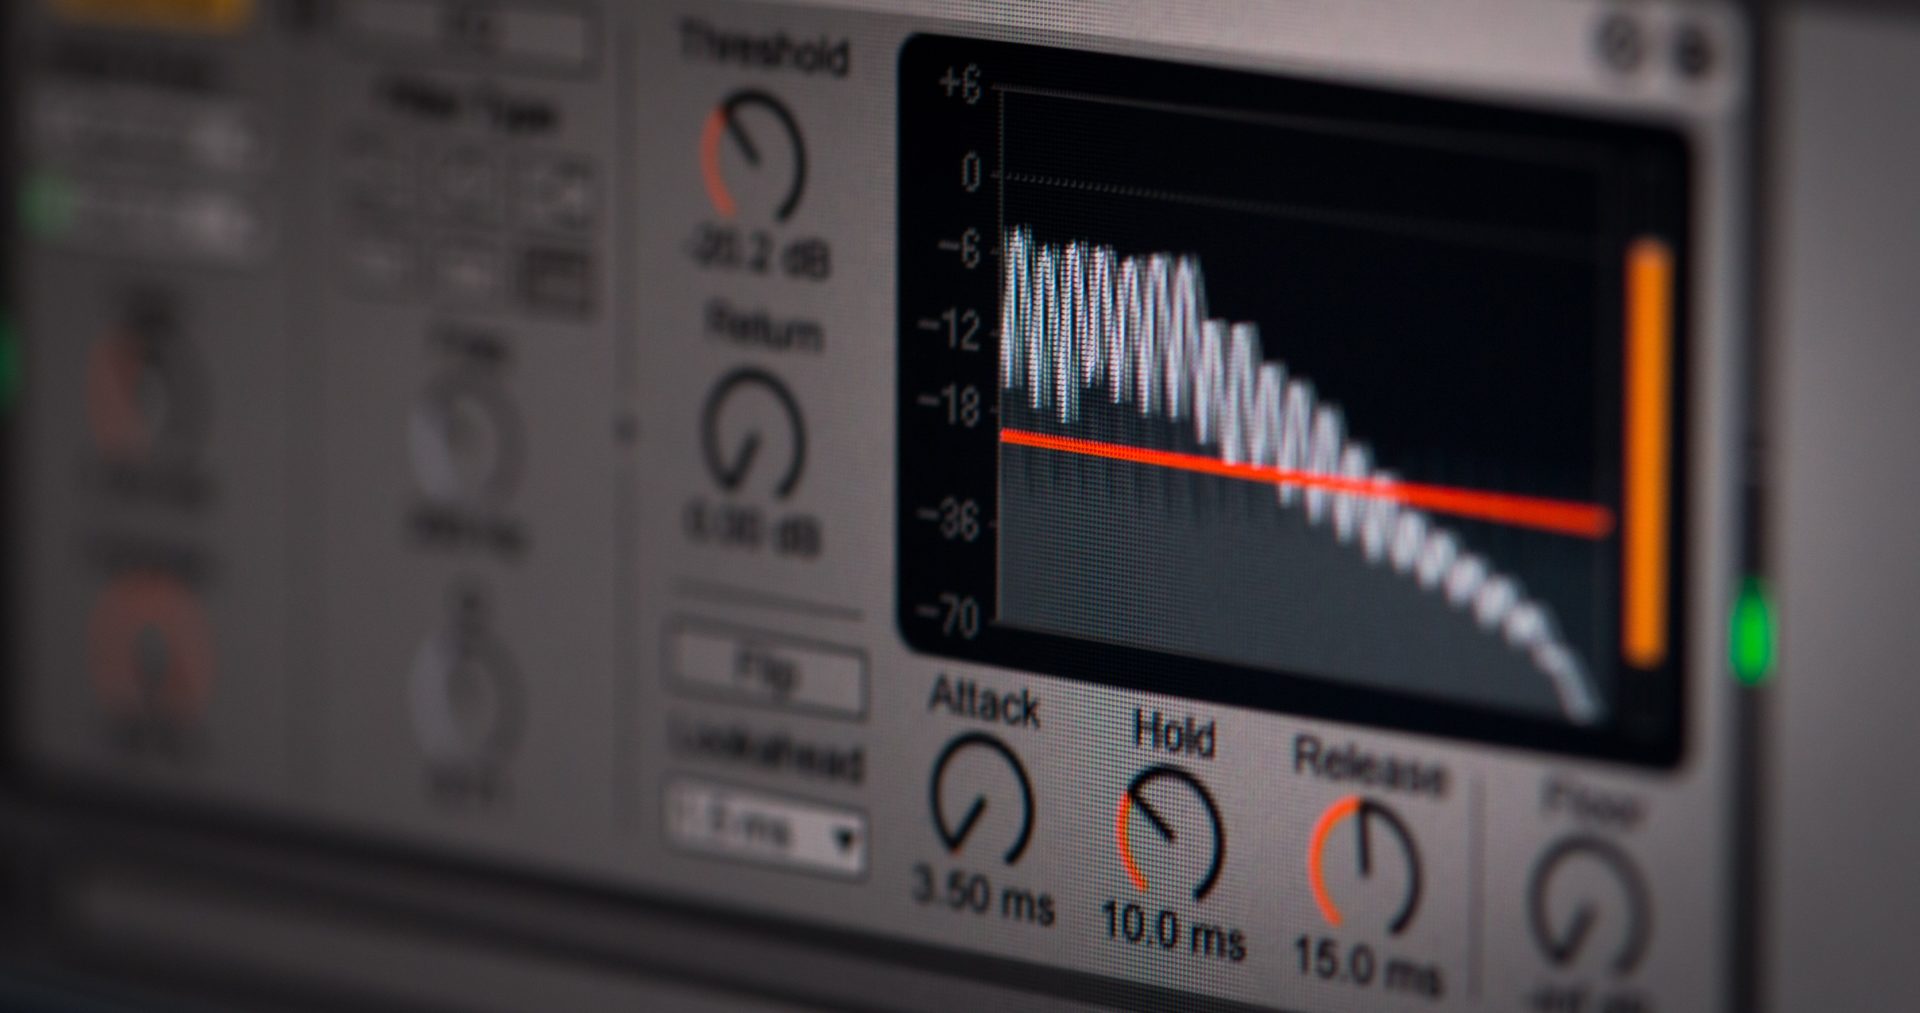
Attack and release are there for using a compressor for different purposes and tackling different kind of balance problems. Different attack and release times give you drastically different outcomes. Here’s an example using different attack and release times for a snare drum:
With fast attack and fast release, the compressor turns down just the transients of the snare. The fast release time assures that the compressor resets before the snare hit is fully through. This way the tail of the snare hit won’t be compressed at all. By matching the gain you have more fatter snare sound.
With fast attack and slow release, the compressor turns down both the transient and the tail, so the level of the whole snare hit is reduced. As a result, by leveling up the gain, you get more even performance.
When using slow attack and slow release you let the transient through and turn down only the tail. As a result you end up with less sustain and more transient. To really hear what attack and release are doing, crank up the ratio and threshold temporarily as well as exaggerate attack and release, then start dialing down.
As you can see, different attack, release and ratio settings give you very different results. That’s why you can’t blindly trust on presets as they can be named misleadingly, or meant to do something entirely else that you’re trying to achieve. Note that attack and release times can affect the amount of gain reduction, so you might have to adjust threshold and ratio along with them.
Stacking compressors
Sometimes one compressor isn’t enough though. You don’t want to push a compressor too hard, so what you could try is to add another compressor on the track. Using gentle settings in both of these compressors, you can achieve a balanced, yet more natural sound. This is called stacking compressors or compressors in series.
Another reason for using more than one compressor is to use them for different purposes. For example if you need to make snare both fatter and more consistent. More experienced mixers are using different compressors to get certain tonal effects and characteristics to a vocal track for example. That’s pointless though, if you don’t master the basic “balancing” moves first. You get really good results sticking with simple balancing moves, so don’t worry about the tonal effects too much.
Parallel compression
One handy, widely used trick is called parallel compression. This means, that you use uncompressed (or slightly compressed) track together with a copy of the same track that’s compressed aggressively. The idea is that you can add weight and power to your track without losing its transients, musicality and dynamics.
For example, you can compress the life out of your drums with fast attack and fast release (and high ratio, low threshold) to bring up the sustain. Then blend the aggressively compressed drums with your “normal” drums. A common way of doing this, is via sends. Send a kick, a snare (and all the other drum tracks that you want) to the same buss and insert a compressor to that buss.
This way you’ll be compressing a copy of your drum tracks, leaving the actual drum tracks untouched. This same tactic can be used to add a bit of distortion to your bass or vocal track for example. Blend to taste.
Mix buss compression
The last piece of advice considering compression in this post, is not by all means the least effective. That is mix buss compression – a compressor that is compressing all your tracks. Route all your tracks to one master track (I usually name it the Mix Buss) and add a compressor there.
You don’t want to over do this. Use gentle settings: slow attack, slow release, 1.5 – 4 ratio and around 1-2 dB of gain reduction. You don’t want to kill the transients, but rather to glue the mix nicely together and give it some power. Remember to match the gain, so you’re not just making the mix louder. I usually do this right after mix buss EQ, before EQing or compressing any individual tracks.
Summary
To sum up, the primary purpose of compression is to help balancing the mix. If a track feels balanced, it doesn’t necessarily need any compression. When using compression ask yourself: Is this helping with the balance issues and do I like the sound of it?
The most important controls are threshold and gain, you can get far with just those two. Use mix buss compression for glue and parallel compression for smack and weight. Remember, in the end compressor is just an automated volume fader, don’t overcomplicate it.
I hope this post opened your eyes in terms of compression. For more helpful content be sure to download my completely free guide 5 Steps to Create Music Faster.
Read also: The Easy Approach to EQ

13 thoughts on “The Easy Approach to Compression”